Friday, October 16, 2020

Http Api - Mock / Redirect tool

 Http API - Mock Redirect is a light weight developer tool, I recently developed.  

Purpose of the Tool:

  1. When we may want to route urls to different hosts (say Dev, Test, Stage env). For ex a url of app may be routed to a host, another url of same app can be routed to different host. It can be configured  at http method as well
  2. When we may want to mock the response rather than calling the actual service/host
  3. This tools also provides view of all request/response processed

How does it work:

The tools starts a http server on configured local port, and will listen to any incoming request. Based on the url mapping configuration (will see later in the section) it will decide whether the request has to routed to the external endpoint or mock response to be sent. 


How to make it work:

Installation:

1.  Java/Jre 8 or above is installed

2. Download the api-mock-redirect-1.0.0.jar from github , and save it in a local folder. It is executable jar - double click to open the tool.

2. Email support@lite-bean.com


Url Mapping - Configuration

1. Provide a config name (config can be later loaded, so give some meaningful name)

2. Provide the local port, where tool should listen to any incoming http request. (port > 5000 -  is preferred. As initial set of ports are reserved for other purpose) 

3. Configure the url for which tool needs to redirect or mock. The url should start from context, and should be valid regex string. For ex: 

       a. users/.* - will handle all request starting with users/

       b. user/[0-9]* - will handle all request for users/<userid>

4. Configure http method, default is * - to support all methods, you may also select any method

5. Configure the option - i.e., Redirect/Mock  (by default it is redirect).

6.  Click edit/pencil icon, which will display fields to configure redirect/mock details. 

In the below example, i have configured an url for "api/v1/employee/<empl_id_numeric>"


Redirect - Configuration

1. Select Protool - Both http & https are supported

2. Enter the host name

3. Enter the port - at which the host is serving the request. (for https it may be 443, for http it may be 80 or 8080)

In the below example, I have configured the redirect to "https://dummy.restapiexample.com/"


Url Mapping 2 - Configuration

On click of "+" will create another row in url mapping, where next url can be configured.

Here I have configured my next url for "api/v1/employees"


Lets add another url to demonstrate mock feature, select Mock option 


Mock- Configuration

1. Configure Response 

2. Type in response headers (click + to add more headers)

3. Enter response body


Save & Monitor Urls

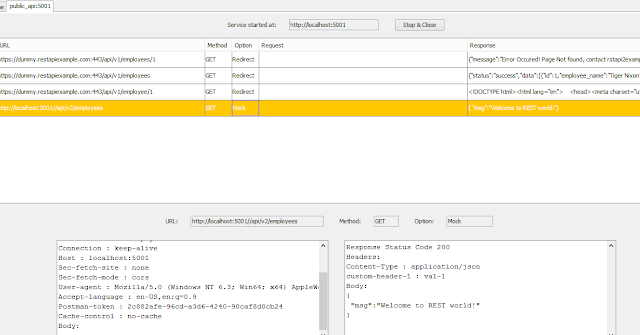
After all above configuration, click Save & Start Service button, which will start the service on configured port and listen to any incoming request. Incoming request will be logged in the tool.

Here the service is started at http://localhost:5001


Demo URL1 - Redirect


Url - http://localhost:5001/api/v1/employees 
Expected output - it should redirect to  "https://dummy.restapiexample.com/api/v1/employees" and fetch the result.

Here we have got the response as expected


Demo URL 2 - Redirect - power of regex


Url - http://localhost:5001/api/v1/employee/1
Expected output - it should redirect to  "https://dummy.restapiexample.com/api/v1/employee/1" and fetch the result.

Here we have got the response as expected


Demo URL 3 - Mock


Url - Mock url is configured as /api/* - so we will have v2, so that it wont qualify for first two urls - "http://localhost:5001/api/v2/employees"

Expected output - it should return mock output.

Here we have got the response as expected

Logs:

As shown below, all request / response will be logged in the tool - on click on any row will display req/response details (including all headers)


Other Features:

1. Service Stop &Close: click "Stop &Close" button on the listening page, to stop the service, and close the tab
2.  Load Saved Configuration:  Now the config is saved, it can be loaded anytime again - all the existing configuration can be reused.


Notes:

1. This is not limited to REST. SOAP over http can also be handled 

2. This tool is not limited to GET. All http options are supported and can be configured

3. Some understanding of REGEX is required to configure url

4. Url Mapping and request headers requires the cell is keyed in out 

5. Any click on edit, remove, add will automatically save the current state of config

6. If no matching url configured, tool will return "404 - resource not found"

7. For redirect - Few request headers (Content-length, Accept-encoding & Host)  are excluded. This can be overriden by adding a file "lb/repo/ignoreRedirectHeaders". Ensure all headers needs to be excluded need to be added here.


Hope this tool will be useful one. Do let me know your feedback/comments.


Friday, April 3, 2020

Structural Patterns: Bridge Vs Adapter Vs Decorator

Structural Patterns: Bridge Vs Adapter Vs Decorator

In this article we will look at Bridge, Adapter & Decorator pattern:

Bridge: Used to bridge two compatible interfaces
Adapter: Deals with two incompatible interfaces
Decorator: Enhance the same interface, such a way the existing object is not impacted


Bridge:

This pattern can be used when we want to bridge/combine two interface/subsystem 

For example Car and Registration are two subsystem, and RegisteredCar bridges both.


Adapter:

This pattern can be used to deal with two incompatible interface/subsystem. Adapter makes things work after they are designed.

For ex: Driver drives Car, now if we want to make driver drives auto?
AutoAdapter ensure driver actions (start, stop) are converted to auto operation (on/off)


Decorator:

This pattern enhances an object, without changing its interface

For example, Honda, Maruti can be enhanced to Sport Car without modifying Car/Maruti/Honda
With this SportCar can be built/enhanced over Maruti/Honda or any Car otherwise we might have built separate class says HondaSportCar & MarutiSportCar.


Hope this was useful one, if you have any question/comment, please comment below, i will try to answer my best. Thank you!

Wednesday, February 12, 2020

Stored procedure (SQL server) Notes


Stored procedure is a sql code or set of sql, which is saved in server side, and can be executed  as many times. We can pass run time parameters to stored procedure. Below are the some of the basic things to write a stored procedure:


  • Create stored procedure
  • Logging
  • Variables
  • Iteration
  • Transaction/Exception Handling


Create Stored Procedure:

CREATE PROCEDURE updateLocality @State nvarchar(50), @City nvarchar(30), @PostalCode  nvarchar(10), @Locality nvarchar(50)
AS
update Employee
set locality=@Locality
where state = @State and city=@City and postalCode=@PostalCode;
GO;

Execute Procedure:

EXEC updateLocality @State='TN' @City = "Chennai", @PostalCode = "600053" @Locality = 'Ambattur'; 

The procedure takes four input parameters (State, City, PostalCode, Locality) and update the locality for those matching state, city and postalcode.

Logging:

1.  First, to log the db response for the sql execution:
SET NOCOUNT OFF;
This logs the db response, for ex: no. of rows updated. This is switched off for debugging/demo purpose but it is always a best practice to switch on to avoid unnecessary log


2. Print execution log, something developer log as info
This can be done using PRINT or RAISE ERROR. The drawback with print seem it will be printed only after the script is executed whereas RAISE ERROR can log it during execution itself

Print 'Execution started'; -- self explanatory

RAISERROR('Execution started',0,1) WITH NOWAIT; 
  • The first parameter is the message to display, 
  • second is the error level, it treats anything with an error level from 0-10 as a message and does not affect code execution
  • third is the system state. This ranges from -1 to 255 and anything outside of that results in an exception 
  • WITH NOWAIT allows the immediate message output describing how the script is executing as it happens

Variables:

DECLARE @Message VARCHAR(100) = 'Welcome to Stored Procedure';
--initialize a local variable Message
--VARCHAR is the datatype/string for message. It can be of any supported datatype
Sqlserver does not support array of values, but we can do is
declare @listOfIDs table (id int);
insert @listOfIDs(id) select ID from Employee where state = @State and city=@City and postalCode=@PostalCode;
--This stores all matching employee id into listOfIDs

Iteration: 

Cursor: Helps us iterate over result set

DECLARE @CustomerId INT, @FirstName VARCHAR(30), @LastName VARCHAR(50)
DECLARE @MessageOutput VARCHAR(100)
DECLARE Customer_Cursor CURSOR FOR
    SELECT CustomerId, FirstName, LastName FROM Customers

OPEN Customer_Cursor
FETCH NEXT FROM Customer_Cursor INTO
    @CustomerId, @FirstName, @LastName
WHILE @@FETCH_STATUS = 0
BEGIN
    SET @MessageOutput = @FirstName + ' ' + @LastName
    RAISERROR(@MessageOutput,0,1) WITH NOWAIT
    FETCH NEXT FROM Customer_Cursor INTO
    @CustomerId, @FirstName, @LastName
END
CLOSE Customer_Cursor
DEALLOCATE Customer_Cursor

Transaction/Exception Handling: 

 By default, all sqls with in the procedure is executed independently, incase of any failure in any sql will not rollback the data. Transaction helps us to execute multiple sqls in a single transaction

CREATE PROCEDURE updateLocality @State nvarchar(50), @City nvarchar(30), @PostalCode  nvarchar(10), @Locality nvarchar(50)
AS
SET NOCOUNT OFF;
BEGIN
    BEGIN TRANSACTION;
    SAVE TRANSACTION OldStateSavePoint;
    BEGIN TRY
    RAISERROR('Execution started state: %s, city: %s, postalcode: %s, locality:%s',0,1, @State, @City, @PostalCode, @Locality) WITH NOWAIT;
    -- update employees
    update Employee
set locality=@Locality
where state = @State and city=@City and postalCode=@PostalCode;
RAISERROR('Employee table updated',0,1) WITH NOWAIT;
--some other sqls
RAISERROR('Table2 updated',0,1) WITH NOWAIT;
-- more
    END TRY
    BEGIN CATCH
    RAISERROR('Rollback - state: %s, city: %s, postalcode: %s, locality:%s',0,1, @State, @City, @PostalCode, @Locality) WITH NOWAIT;
    ROLLBACK TRANSACTION OldStateSavePoint;
    END CATCH
   
update Employee
set locality=@Locality
where state = @State and city=@City and postalCode=@PostalCode;
END;
GO
This ensures the transaction is rolledback incase of any failures


References:

https://www.w3schools.com/sql/sql_stored_procedures.asp
https://docs.microsoft.com/en-us/sql/t-sql/statements/create-procedure-transact-sql?view=sql-server-ver15
http://structuredsight.com/2014/11/24/wait-wait-dont-tell-me-on-second-thought/
https://stackoverflow.com/questions/2622230/how-can-i-iterate-over-a-recordset-within-a-stored-procedure
https://dba.stackexchange.com/questions/134129/transaction-in-a-stored-procedure

Friday, May 24, 2019

Step towards Eclipse Plugin Development -Series 1

Step towards Eclipse Plugin Development - Series 1

Few days back, I had an opportunity to write an Eclipse plugin. I had written one before as well, but  I found it very hard to recollect. I will try my best to to capture the concept of plugin development rather than implementation detail. 

Eclipse plugin is hard for first timers, but once you have some basics it is easier to develop. Thanks for eclipse plugin wizard, which comes with sample code & configuration. With some basic knowledge and inbuilt sample code we should be able to penetrate through the Eclipse PDE


Hang a picture on wall:

Consider Eclipse PDE as like hanging a picture on wall. To achieve that we need three things
  1. Picture
  2. Wall position (where to hang)
  3. Nail/ substance to hold picture & wall

In the same way, in eclipse plugin development, we have three things at high level
  1. Plugin - core logic / plugin (picture)
  2. Extension point - where to display the plugin (wall)
  3. Extension - holds the plugin and extension point (nail)


Extension point:


Extension point can be menu, or new wizard (file > new), from where we can host/invoke our plugin

Most used menu types:
Context menu – menu invoked by a mouse right click. Sometimes called also popup menu.
Main menu – menu always visible on the top of GUI.
Main toolbar – always visible toolbar available under the main menu

Plugin:

There are two framework available for menu plugin
1. Handler - depreciated
2. Command

The command/handler class will get the control when user clicks on our plugin menu, from where we can do the logic of our wish.

With this, now lets get our hands into plugin development.

Installation

Ensure Plugin Development Tools and RCP component are installed

Help > install new software >> Choose Eclipse project updates in drop down
choose Eclipse plugin development and RCP


First Plugin Project


Page 1:
File >> New > Eclipse Plugin Project

Enter project name
Target platform - eclipse version the plugin to support. It is always better to develop the plugin on version you target

Page 2:
Check Generate Activator
Rich Client Application: No

Page 3:
Choose Hello world command - will generate sample code, there are also many other sample available, which we may choose as when required


This will create a helloworld plugin, which will be hosted on tool bar, on click of it will print a dialog "Hello, Eclipse world"


Execution:

Right click the plugin project, run as eclipse application
will open a new eclipse instance,where you will be able to find the new plugin


Source Analysis:

Below are the auto generated files in the new project, lets look at it:

Activator class - Take care of eclipse life cycle

*Handler class -  Receives control on click of plugin, and prompt the dialog message

MANIFEST.MF- holds on bundle/target information, like dependencies, target environment, etc
 
build.properties -  holds information about the folders/files needs to considered for packaging

plugin.xml   -      Most important file for plugin, onclick on it will open the  wizard in eclipse editor with multiple tabs. Click on extensions tab, where you will see all the extension used for the plugin. Drill down on menus to see the places where the plugin is configured


With this we have successfully developed our first plugin, in the subsequent series we will look into real time scenarios 


Friday, July 10, 2015

Http REST

Http REST

One of the primary reason why REST is simple to use is because REST uses HTTP as not just transport layer but as an API.

HTTP as an API

Http Methods

Any REST services can be accessed only by well-known HTTP methods
          GET   -        Retrieve
          POST -        CREATE
          PUT    -        Update
          DELETE -     Delete

You might argue the SOAP allows to have developer defined methods, whereas here it is limited to these methods. DB has only these operations but still able to meet their expectations, REST will so.

Http Errors

REST client knows about the status of their request from the traditional Http status code 
         
          100 - 199  - Information
          200 – 299 - Success
          300 – 399 - Redirection
          400 – 499 - Client Side Error
          500 – 599 - Server Error

Few of the most commonly seen codes:
          200 – OK
          400 – Bad request
          405 – Method not allowed
          500 – Internal Server Error 


A Recap - Http Servlet:

When we speak about Http methods, the first thing comes to our mind is Http Servlet where we override doGet & doPost methods. However we use these methods interchangeably but in REST it is advisable to use the appropriate method. Since Http servlet is built for http methods it is always the easiest choice to implement REST service.


REST – Representation State Transfer

The Heart of REST is “Resource”, which resides in the server whose state is transferred from client to server and vice-versa.


Resource

Each resource is unique in an application
   Can be identified by URI (uniform resource identifier)
   Can be accessed via Http Methods [GET, POST…]

Representation

A temporal state of the Resource at the time of the request, it can be of any format
     XML
     JSON
     HTML
     Or any other thing which comes in future   
           
The page you are viewing now is the current state of the article represented in html format transferred from server [blogger.com] to the client [your browser].
How is web application different from REST service? Any stateless [does not require user session], Independent web page can be said as REST implementation. Here it is represented in text/html format.

Guidelines to implement REST service

     
    1.   Identify Resources
    2.   Decide the Representation [xml, json, etc]
    3.   Define URI for the resources
    4. At last, lets worry about the implementation technology & frameworks  
  

Jersey [JAX-RS] reference implementation

Jersey [a JAX-RS implementation framework] is one of the most commonly used REST framework. 

Jersey Annotations

URI:

@Path –
a.    Declared at the class level to indicate the class [pojo] is a Resource which can identified by this URI
b.    Declared at Method level to indicate the relate path with in the Resource URI

Http Methods:

@GET
@POST
@PUT
@DELETE

URI Variables:

@PathParam

This is used together with @Path & in conjunction with @GET, @POST, @PUT, @DELETE
Variables in the URI can be read as PathParam in to method


Input & Output Formats

@Consumes

Applicable for @POST & @PUT

The input format the methods support i.e, “application/xml” here. The client will be setting the header “Content-Type” as “application/xml”   


@Produces
This works with @GET, @POST & @PUT

The client sends HTTP Request together with an Accept Http header that map directly to the content-type the method provider.


Form Param

This allows http form to be submitted to service


Exercise – Built a simple REST service & client using jersey 2

Resource:     Book
Representation: JASON
URI: /book/{bookName}
Fwk: Jersey 2

Rest Service

     1.   Built a simple webapp maven project
     

    2.   Import the  maven project into your workspace
    3. Add Jersey dependencies in project pom.xml
    

   4.  Create a simple Book Resource
      
            Here the java-jason conversion is handled by Jackson framework.

    5.   Configure rest servlet container in web.xml


    6.   Deploy the app to any j2ee container

You can choose your choice of app server.Jetty is a light weight server which I have used for testing this rest service.

Version: jetty-distribution-8.1.0.RC5

Copy the project war to jetty webapp and start the server
java –jar start.jar
   

     7.   Test the service using chrome advance rest client app
           
   Method : GET

Upon submitting the request, you should get the below Jason response

 {"name":"sampleBook","author":"xyz","publisher":"abc"}


Rest java Client

    1.   Built a simple java maven project


   2. Import the  maven project into your workspace
   3. Add Jersey client dependencies 


  4. Create client


  Here the JacksonFeature will transform the jason to java bean. 

However I had few version issues which I couldn’t resolve, hence I had to use Jackson ObjectMapper to convert Jason to java manually i.e., something similar to below

String content = target.request().get(String.class);
ObjectMapper mapper = new ObjectMapper();
Book response = mapper.readValue(content, Book.class);

  
I hope you would have got some good understanding on REST & JAX-RS/Jackson framework.  

Thank you. Hopefully I'll meet you again in my next article :)

Friday, May 8, 2015

Focus SOAP


SOAP, Payload, RPC, WS, JAXB, SOAP 11, 12, what are all these? How are these used in webservice?  Do you have these question in your mind as well?

I recently read a wonderful book titled "Java Webservices Up & Running" by "Martin Kalin" which explains the internal working of SOAP in detail. I thought of sharing my learning in my own words.

What is SOAP?


SOAP - A XML


In any client/server architecture data needs to be passed in some form. Here it is an xml which is nothing about SOAP.

                                           Components of SOAP Message 


SOAP - An Infrastructure [Transport Neutral]

SOAP can be transported through SMTP, MQ, etc. However HTTP remains most popular SOAP transport protocol.

SOAP - A Contract [WSDL]
SOAP provides a contract/agreement in the form of WSDL [webservice description language], where the service, operations, transport, location, etc are described.

In order to implement a working SOAP model you might be assuming that we have to be well versed with Networking, XML [Service call, XML construction/Parsing, etc]  but that is not the case as there are utilities [available in almost all languages] which makes things simpler. 

Java Support for Webservice - [JaxWS]:

Starting Java 1.5 comes bundled with JAX-WS, which provides utility to generate stub, request, response & dependent class from the wsdl, service.  First version of JAX-WS was called JAX-RPC, whose support is limited to RPC style.

Two styles of SOAP Web services:

RPC [Remote Procedure call] - It supports only simple types like String, Integer, etc.

Document - Can support Complex types. The WSDL type section defines the schema of complex types. By default the style is Document.

RPC Style
Server Side Implementation:

1. Service 


Note: The style is explicitly declared as RPC

2. Publish the Service

In general the service are deployed to J2EE server like tomcat, but to keep things simple the above service will be published in a standalone mode [using Endpoint]


3. WSDL

Up on execution java EndpointPublisher, the service starts and the WSDL can be viewed upon hitting the url http://localhost:9090/calc?wsdl

Takeaway sections from WSDL


types          Defines all complex types involved in the service.
                    Here it will be empty, as RPC is meant for simple types

portType    Defines the service signature, equivalent to java interface
                    i.e., method [operation] name, arguments [input] & return [output]

binding      Can be considered as implementation of above interface [portType]. 
                    This also declares transport,  soap style.  Here the transport – http, & style is RPC

service       Holds the URL where service is available


Client side Implementation:

1. Generate client classes from WSDL


WS import utility will generate required client classes from WSDL. Earlier this utility was called as WSDL-to-Java, now it is renamed to wsimport.


    wsimport -p rpcclient -keep http://localhost:9090/calc?wsdl


where:
p    -     package [files will be generated under this package]
keep -  Retain the Source code of client class

This generates the required stub under rpcclient folder 

2. Client


Where CalcServiceService & CalcService are the wsimport generated classes. The service.getCalcServicePort() returns port [ie.,interface] from which we can make the necessary operation

Upon executing the client, Java CalcClient
Result:                                    output 75.0

Here we deal only with Java objects, however behind the screen it’s all SOAP xml. Jax-Ws takes care of binding java & xml using JAXB [Java API for XML Binding].

Below is the SOAP Request/Response of the above service/client captured using tcpmon. The soap webservice can be invoked directly with soap request with any soap supported tool like soap ui, etc.


Document Style

Server Side Implementation:

1. Service - Remove Style from Service [By default the style is document] 


2. Wsgen utility generates the java types required by publisher to generate WSDL [can be ignored in ede's like eclipse]
       wsgen -cp . learning.websrvc.soap.service.doc.calc.CalcService

3. Publish the DOC service [same like RPC]

4. WSDL View 

Up on execution java EndpointPublisher, the service starts and the WSDL can be viewed upon hitting the url http://localhost:9090/calc?wsdl


One of the key difference between RPC & DOC wsdl is the type section
Here it defines all complex types involved. The complex types can be directly embedded in wsdl or the schema can be imported in to the type section.  

Client Side Implementation: [The same as RPC]

1. Generate client classes from wsdl 
        wsimport -p docclient -keep http://localhost:9090/calc?wsdl

2. Client

Document style is not limited to simple types, this can support complex types as well. WSDL type section holds all complex types involved in service. 

Here Document client looks similar to RPC style i.e., parameterized invocation. This type of client is called Wrapped Client - where the req/response is wrapped to look like parameterized call. There is another type called UnWrapped/BARE client – where the request/response are exposed as it is as single object. These two types differs only on the client side, the soap req/resp does not have any change nor the server side. Wrapped is by default and is commonly used.

UnWrapped/Bare Client
1. Explicitly declare the Wrapper False, in a file name "custombinding.xml", and pass this to wsimport
    wsimport -p rpcclient -keep http://localhost:9090/calc?wsdl –b custombinding.xml


2. Client


Here you can see, the request & response is exposed as it is in SOAP in to a single object Add & AddResponse respectively.

Handlers:

Just like filters in servlet we have handlers in SOAP, which can intercept request, response at both client & service side. Handlers are classified into two types 

1. SOAP Hander -     Has access to SOAP Envelope [Header + Body]
2. Logical Handler - Has access only to the payload [Body]


Handler chain can be configured in the order it needs to get invoked on every in/out. I have seen usecase where the authentication, logging are done at the handlers level. Incase of any failure the handlers can throw Exception [An exception class with getFaultMessage() ]

There are more to it. But I will wrap up here. I believe this will be useful piece of info for you as well. Please don’t forget to leave your feedback, suggestion, improvement comments. 

Thank you!